The first four steps on this page ask you to think about the algorithm you'll use to build this program. You shouldn't be doing anything in Snap! during those steps.
- There is a single lane of traffic, and cars can't pass each other.
- The highway is straight with no stoplights, speed-change signs, or obstacles.
- Drivers change speed to fit the traffic.
- If a car is too close to the car ahead of it, it slows down.
- Drivers speed up whenever they can, up to the speed limit.
- All cars behave the same. They speed up and slow down equally well. (Their engines and brakes are equally good.)
- Since the stage is not as wide as Arizona and since it is a nuisance to create 100,000 cars (sprites), you should recycle cars as they leave the stage, starting the same car again on the other side of the stage.
- You can decide...
- ...how close is "too close" to the car in front;
- ...how a car speeds up and slows down;
- ...the speed limit;
- ...how many cars to put on the road;
Each of these steps asks you to think about one part of the program. You'll definitely want to talk to your partner. You may even want to write some things down.
-
Consider the overall setup. Each car is a sprite. All sprites will have essentially the same scripts. The only difference will be where the car starts in line and which car it is following. So, this is what car 5's scripts might look like. (But don't start building them now. Your programming starts in problem 5 below.)
You will have to inventstartposanddrive but avoid hitting sprite.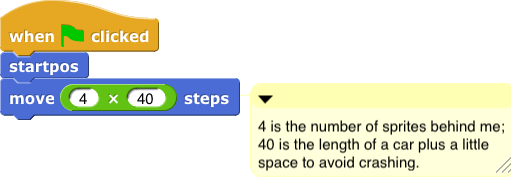
 Because our version of
startposis the same for all sprites, it put all the sprites in the same place. So we needed each sprite tomoveto space out the cars. Your program might be different.The
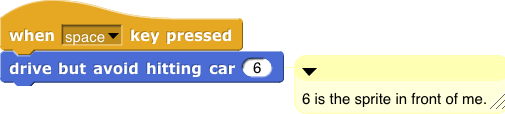
drive but avoid hitting spriteblock will repeat a set of actions that might be like this:
- If too close to next car, change speed to lower speed; otherwise, change to higher speed.
- If over the speed limit, change to lower speed.
- If at the end of the stage, go back to the beginning.
- Move at my own current speed.
-
Analyze the state of one vehicle.
 What variables will it need?
- You might want to make variables for the rate of acceleration and the rate of braking so that you can experiment with them.
- You must have a variable for the cars' speeds: Each car has its own speed, so that variable will be a list of speeds, one for each car.
- You must set a speed limit, and you might want to be able to experiment with it.
- Are there other variables you need to keep track of? (Maybe. Maybe not. Keep your model simple. You can always add features later on.)
- Analyze the behavior of one vehicle. If it sees a car in front of it, it should slow to the speed of that car. Otherwise, it should speed up. The distance to the car in front should probably matter.
-

Design an algorithm for the behavior. Exactly how will the car's speed change? When it is close enough to the car in front of it, will it just become the speed of that car? Or will it slow down more gradually? It must not crash or pass.
Below is one possibility. Notice how it uses
replace itemto replace the old speed with the new speed. This version just replaces it with a speed slightly (and randomly) less than the car in front of it.
.png)
When the car has lots of room in front of it, how will it speed up? It must not exceed the limit.
-
NOW, program your algorithm in Snap! Give one sprite the ability to detect its distance to the (not-yet-existent) sprite ahead of it, and write the script that uses that to control its forward motion. Make sure that when a car goes off the screen it comes back in the other side.
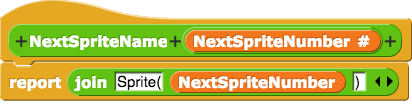
Here are two tools we found useful. You may or may not need them, depending on how you program your model. The 12 in
SpriteNumber in front of mewas the number of sprites in our model. You may need a different number there. You might also build this tool quite differently.
.png)
- Clone your sprite to create enough cars for your simulation.
- Make sure the highest-numbered car knows to follow the lowest-numbered car. Depending on how you've programmed, that one behavior might be slightly different from every other car's behavior.
-
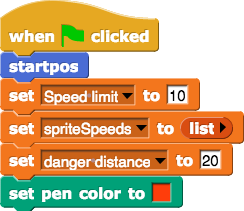
Initialize: Set your cars out in some starting position, and give each car whatever other information it needs to start off.
One sprite will also need to set the variables that all sprites use. In our model, the script looked like this:
- Test and refine your model: Do the cars keep moving? Do they avoid crashes as they should? Does traffic flow smoothly? Do you see changes in speed? Adjust your model, if necessary, so that it works.