The TIF part B requires edits since the last Snap update. --MF, 7/16/19
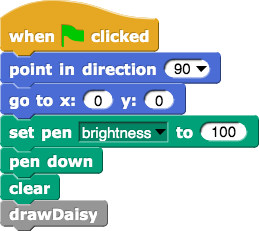
Here's what worked for me, but I also think we shouldn't be so prescriptive in a TIF (If we want to offer code, perhaps we should just give the image of the instrution or maybe so something like in the Vaníček stuff?).
Also, there is still camelCase in the solutions for this lab... --MF, 7/16/19
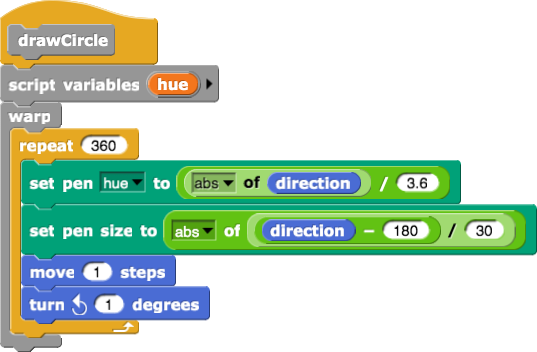
In this project, you are going to write code to draw the geometric design shown below, explore its variations and use it draw more complex designs.
You can watch this animation to get some ideas.
This is small and hard to see. Make it larger in an endnote behind a click? --MF, 7/16/19
Discuss how this design was created. What are the fundamental building blocks? How are these arranged?
The entire design is made up of circles. So the first thing to do is to write code that will create a circle. To do this, create a custom block Draw Circle via the “Variables” menu “Make a block” option. Hint: A regular polygon with 30 or more sides is a good approximation for a circle.
Now that you can draw a circle, you can generate the Daisy Design by rotating your sprite a bit at the end of each circle drawn. In the design above there are 24 circles. How much must the sprite turn each time a circle is drawn in order to make a full cycle of 360° when all the circles are drawn? Create a custom block Draw Daisy to do this.
Extend your code so that you can create the following patterns.
Consider the following variations on the pen color and thickness for the Daisy Design. Note that in the first design, color changes within each circle, while in the second design, pen thickness changes within each circle. Study the code and explore your own such variations.
Create your own variations of the Daisy Design and share with your classmates.