Processing Each Item in a List

Ruthless Suggestions from Al

This page is long. I suggest we consider breaking page between 2 and TOL and again between TIF and 7--making this into 3 separate pages. --MF, 9/26/18

Need to replace problem decomposition with modularity per AAP-3.B.2 and AAP-3.B.2. See vocab box on 3.2.4, Selecting Specific Data. (Appears on pages U2 furture OP Diagonal Design (mandala); 3.1.4, brick wall; 2.OP.4, plurals 1; and TG for 2.2 and 2.OP) --MF, 4/9/19

VAGUE OUTLINE FOR NEW VERSION


In this lab, you will create tools for drawing complex designs from lists of points. To do this, you will use modularity—breaking down the problem into smaller pieces.

On this page, you will create a script that lets you connect the dots (given by a list of points) to draw the letter A.


Alphie and Betsy are building a program that will take a list of points as input and connect the dots. They sketched the letter A on graph paper and listed the vertices.
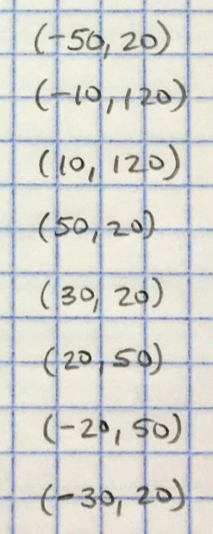
Letter A drawn of graph paper with corner coordinatesCorner coordinates (-50, 20) (-10,120), ... (-30,20)

Need to integrate this content pulled from 1.2 somewhere in this lab. --MF, 5/17/19
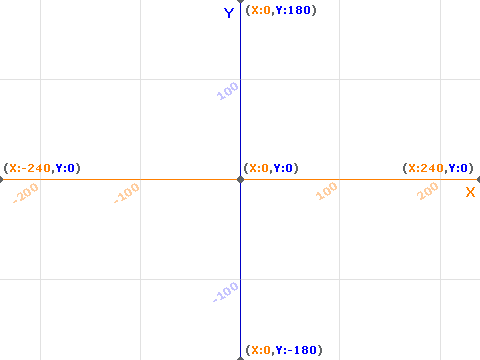
Locations on the stage (the white rectangle where sprites perform their scripts) are specified by coordinates. The center of the stage is (0, 0). The left edge is x = -240; the right edge is x = 240. The bottom and top are y = -180 and y = 180.
Snap! coordinate plane with labels

I like this text and woner if we would use it elsewhere:

Yes, you can make your blocks show what type of data they expect as inputs: a number, a list, or some other type. Some languages require the data type to be indicated. In Snap! it's an option. It's not necessary but, like assigning a color to a block, it can be a helpful reminder of what the block does and what type of input it expects. You've already seen input slots of several shapes, indicating different expected data types.

Computers can help us collect data. Sometimes, we want to pull the data off of an image: of a graph, a letter, the coordinates of features of a face, the measurements of some bridge…. This lesson shows how to import an image and digitize particular points that can later be used to reproduce the image or be processed in some other way. (From PG)

write a program so that if we have a picture, we can click on the corners and let the program collect the coordinates

we can import images as a stage background

  1. Build a point constructor to use in the go to 'dropdown input slot'
  2. Build a draw shape() block that takes a list of points as input. (show images of it taking a list and also taking a variable and of that variable being set as a list--perhaps all behind a click.)
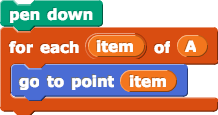
  3. Some incarnation of Alphie's bug in #4 below.

    pen down;for each(item) of (A){go to point(item)}

  4. Think and write:
    • For what purposes might you not want to connect the first and last points?
    • For what purposes might you want to have the pen down only when the sprite marks each point, but never when the sprite moves from one point to another?
    • I think it should be asked the other way! I've never understood why it's glide. -bh
    • For what purposes might you prefer go to over glide?
  5. Select a stage background of your choice.

    Setting the Stage Background

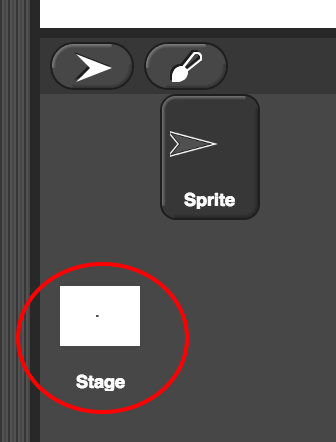
    1. Click the Stage button below the actual stage.
      stage button in sprite corral
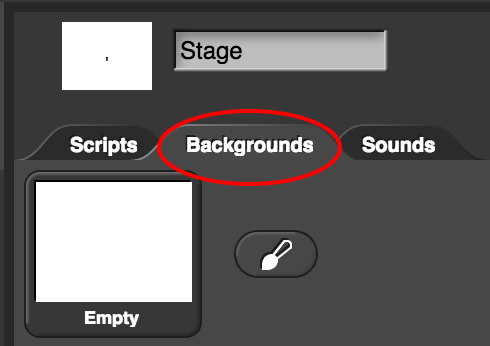
    2. Click the "Backgrounds" tab near the top of the window.
      I cropped this image because it was distractingly long unnecessarily. --MF, 3/4/19
      backgrounds tab
    3. Select or import a stage background. In this project, you will find two imported backgrounds:
      • A graph of median U.S. household income by year (source: Federal Reserve Bank of St. Louis)
      • A capital "E" (font: Century Gothic Bold).
      • The graph is typical of data processing, which is one topic of Unit 3. The E continues the activity from the previous page. Choose either background by clicking on it.
  6. initialize the point list variable to an empty list first.
  7. we know how to make the sprite follow the mouse; we did it in Unit 1
  8. When we click, we should give the user some feedback that the click has been processed. we should mark each point somehow so we feel confident the computer is recording our clicks. There's a stamp block (in Pen) block that stamps a picture of the sprite right where it is on the stage.

intro to collecting points as data


OLD VERSION FOLLOWS


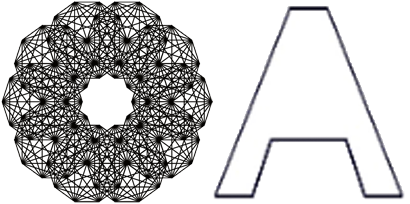
decagon-mandala-ring-and-outline-of-letter-A

In this lab, you will create tools for drawing complex designs from lists of points. To do this, you will use problem decomposition—breaking down the problem into smaller pieces.

On this page, you will create a script that lets you connect the dots (given by a list of points) to draw the letter A.


Alphie and Betsy are building a program that will take a list of points (each of which is a list of x and y coordinates) as input and connect the dots. They figure they can use it to draw pictures or graphs of data:

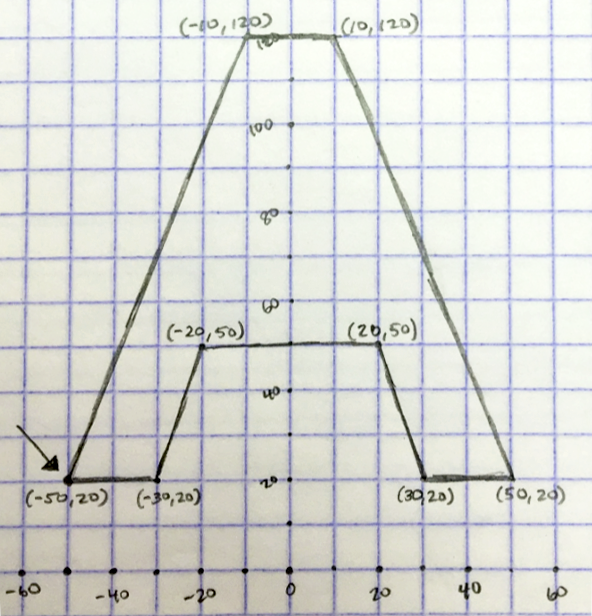
To make a set of starting data, they sketched the letter A on graph paper. They chose a scale that they figured would make their picture a good size on the stage.
ST-Many NYC teachers were confused and thought they are creating the list A themselves whereas we give it to them in the starter file.
Letter A drawn of graph paper with corner coordinatesCorner coordinates (-50, 20) (-10,120), ... (-30,20)
Then they listed the coordinates of each vertex, starting at the arrow and going clockwise around the figure. The first point is at (-50, 20), the second is (-10, 120), and so on. Then they built that list in Snap! like this:
coordinate-list-for-A
Now they need a script that will use that list to make the drawing, like this:
sprite drawing letter A by going to each set of coordinates

Betsy: This list of coordinates outlines an A, so let's name it A.
I don't think we should use code tags for Make a variable. Should we? --MF, 12/19/18

Betsy clicks Make a variable, names it A, and builds set A to {{-50,20}, {-10,120}, {10,120}, {50,20}, {30,20}, {20,50}, {-20,50}, {-30,20}}.

Then she clicks that set block to run it.

Alphie: So, for each of those eight points, we want the sprite to move to it. HM... go to x:() y:() won't work, because it needs two separate inputs. We need a block that takes one input, a point like list(-50)(20).
Betsy: So we'll make a new block. Let's call it go to point. It'll work like this go to point (list (-50) (20)). We'll use go to x:() y:() or glide (.5) secs to x:() y:() inside it, but we'll have to process the input, list(-50)(20), to supply x: and y: separately. Hmmm...
Gamal: Oh! I know how! I bet we can use item()of(list). Give it a number as its first input. I bet that the rectangle with two smaller orange rectangles inside just says that it expects a list as its second input.
Alphie: I wonder if we can make our go to point block show that it expects a list as input....
Need to integrate this content pulled from 1.2 somewhere in this lab. --MF, 5/17/19
Locations on the stage (the white rectangle where sprites perform their scripts) are specified by coordinates. The center of the stage is (0, 0). The left edge is x = -240; the right edge is x = 240. The bottom and top are y = -180 and y = 180.
Snap! coordinate plane with labels

Yes, you can make your blocks show what type of data they expect as inputs: a number, a list, or some other type. Some languages require the data type to be indicated. In Snap! it's an option. It's not necessary but, like assigning a color to a block, it can be a helpful reminder of what the block does and what type of input it expects. You've already seen input slots of several shapes, indicating different expected data types.

  1. Click here to load a starter project. Then save it.
    This project file contains the list of points for the letter A, but you need to build their go to point block that takes a point as input.
  2. Specifying an Input Type

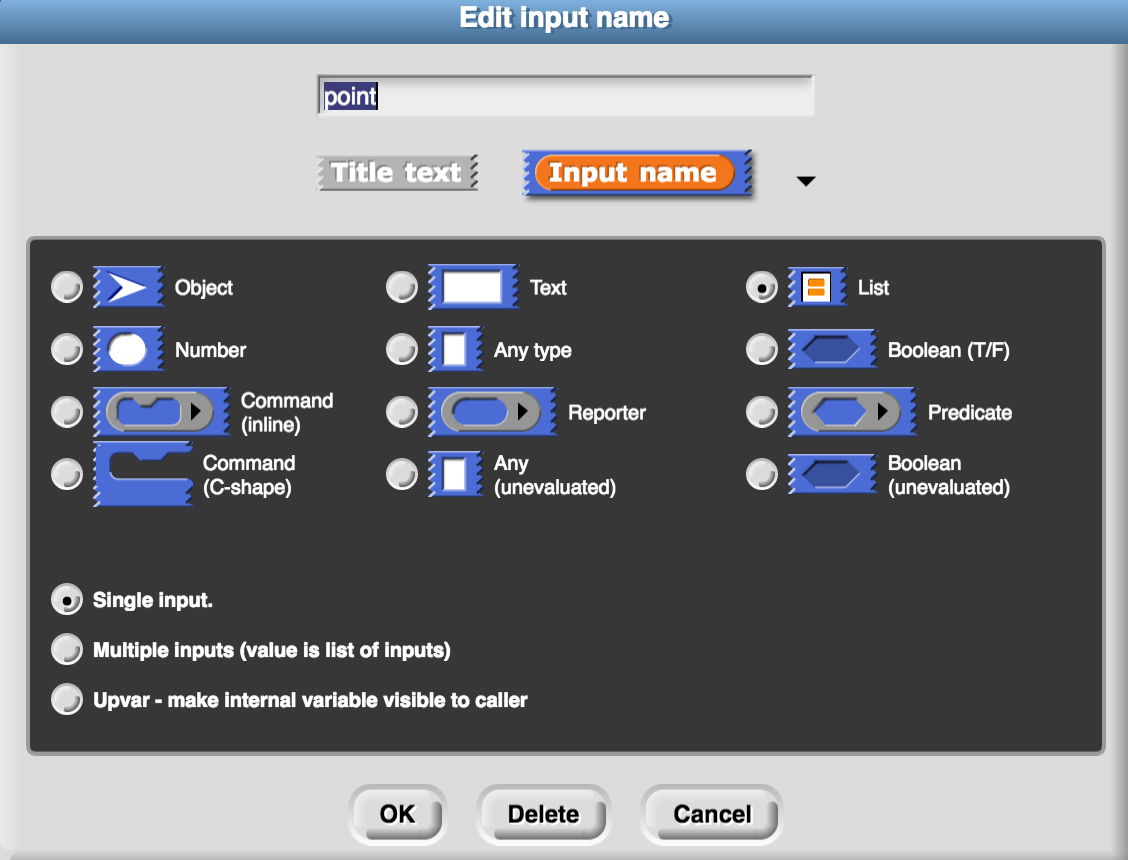
    This animation shows you how to specify the list input type (list input type: rectangle with two smaller orange rectangles inside). Other input types are specified the same way.
    List input type selection
    Notice in the video that there are many input types you can specify (Text, Number, Boolean, etc.) The list input type is chosen because a point is a list of two coordinates.
    Input types, list type selected
    After creating the title and naming the input,
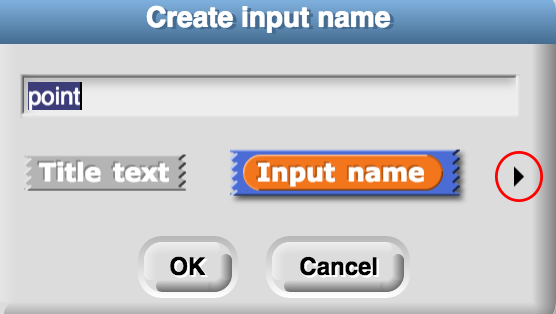
    1. Click on the arrow to the right of the input name:
      create input name right arrow
    2. Choose the data type you want for that input.
    3. Click OK.
  3. Finish building your go to point block and test your block with a few points as input to make sure it does what you want it to.

Suggest page break.

Brian now agrees with having a page break here. --MF, 12/19/18 OTOH we should decide if we want to take advantage of Snap!'s ability to take lists in GO TO.

 
Alphie: Great! Now we can use our go to point block for each of the points in our list.
Betsy: I bet we can use for-each-(item)-of(){}.

Alphie and Betsy design this new script to automate the process of going to each point.

pen down;for each(item) of (A){go to point(item)}

Then they test it out.

Alphie: Yup! for each does exactly what we want. But we have a couple of bugs to fix.
  1. Build and test the script they used.
  2. Fix the two bugs Alphie noticed.
  3. "U2L2-DrawShape"Save your work as U2L2-DrawShape
  4. Think and write:
    • For what purposes might you not want to connect the first and last points?
    • For what purposes might you want to have the pen down only when the sprite marks each point, but never when the sprite moves from one point to another?
    • I think it should be asked the other way! I've never understood why it's glide. -bh
    • For what purposes might you prefer go to over glide?
  1. Create three new points and a script that draws the complete letter A. You'll have to design a way to indicate in a list of points that they aren't all connected.
    Choose the additional coordinates yourself.
    complete-drawing-of-letter-A